Mastering CRUD Operations with Next.js 15 and MongoDB

Building robust web applications requires seamless data management. With Next.js 15 and MongoDB, developers can create powerful, scalable CRUD (Create, Read, Update, Delete) applications. In this guide, we’ll dive deep into creating a CRUD app, offering actionable insights, best practices, and code examples to help you build full-stack applications efficiently.
Table of Contents
Introduction: Unlock the Power of Next.js 15 and MongoDB
Ever struggled with backend logic while building full-stack applications? You’re not alone. Many developers face challenges when integrating a backend with a modern frontend framework. Enter Next.js 15 and MongoDB — a dynamic duo offering server-side rendering (SSR), API routes, and an intuitive NoSQL database. This guide simplifies CRUD operations, transforming complexities into straightforward, actionable steps.
Why Choose Next.js 15 with MongoDB?
MongoDB is a NoSQL database known for flexibility, scalability, and ease of use. When paired with Next.js 15, it provides a perfect environment for building complex applications quickly.
- Full-Stack Flexibility: Next.js 15 supports server-side, client-side, and static site generation.
- API Routes Integration: Build secure APIs without an external backend.
- Scalability: MongoDB’s flexible schema enables effortless scalability.
- Developer Experience: Extensive documentation, TypeScript support, and active community.

Folder Structure Overview
Here’s how the project structure should look:
nextjs15-crud/
├── lib/                  // Database connection
│   └── mongodb.js
├── models/               // Mongoose models
│   └── Task.js
├── pages/                // Next.js pages and API routes
│   ├── api/              // Backend routes
│   │   └── tasks/        // CRUD routes
│   │       ├── index.js  // POST & GET (Create & Read)
│   │       └── [id].js   // PUT & DELETE (Update & Delete)
│   └── index.js          // Frontend main page
├── public/               // Public assets (if needed)
├── styles/
│   └── globals.css        // Custom styles
├── .env.local            // Environment variables
├── next.config.js        // Next.js configuration
└── package.json          // Dependencies
Setting Up the Project
1. Environment Setup
Prerequisites:
- Node.js installed
- MongoDB Atlas account (for cloud storage) or a local MongoDB installation
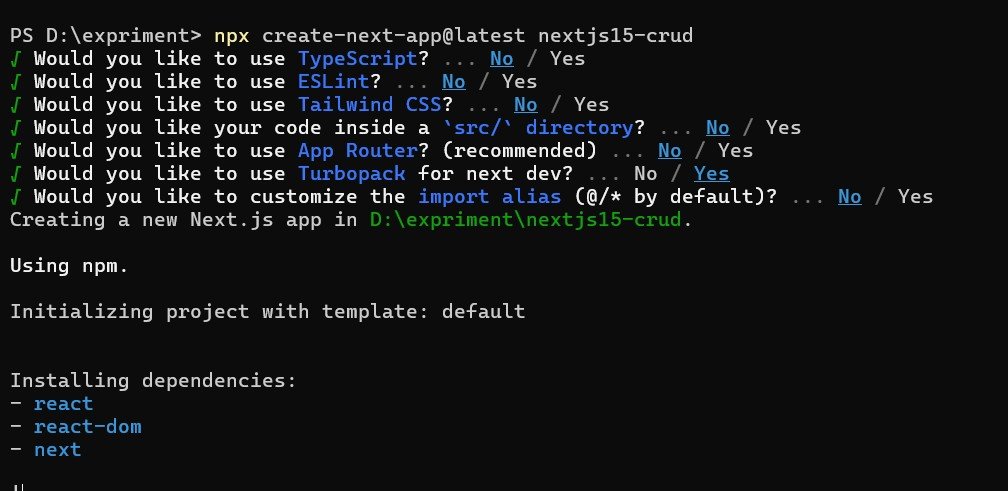
Step 1: Create a Next.js App
npx create-next-app@latest nextjs15-crud

cd nextjs15-crud
npm install
Step 2: Install Dependencies
npm install mongoose dotenv
Step 3: Configure Environment Variables
Create a .env.local file:
MONGODB_URI=your_mongodb_connection_string
CRUD Operations Implementation
2. Connect to MongoDB
Create a new file lib/mongodb.js:
import mongoose from 'mongoose';

const connectMongo = async () => {
  try {
    if (mongoose.connection.readyState >= 1) {
      console.log('Already connected to MongoDB');
      return;
    }

    await mongoose.connect(process.env.MONGODB_URI, {
      useNewUrlParser: true,
      useUnifiedTopology: true,
    });

    console.log('MongoDB connected successfully');
  } catch (error) {
    console.error('MongoDB connection error:', error.message);
    throw new Error('Failed to connect to MongoDB');
  }
};

export default connectMongo;
3. Define a Mongoose Model
Create models/Task.js:
import mongoose from 'mongoose';

const TaskSchema = new mongoose.Schema({
  title: { type: String, required: true },
  description: { type: String, required: true },
  completed: { type: Boolean, default: false },
});

export default mongoose.models.Task || mongoose.model('Task', TaskSchema);
4. Create API Routes
Create Task (POST)
In pages/api/tasks/index.js:
import connectMongo from '../../../lib/mongodb';
import Task from '../../../models/Task';

export default async function handler(req, res) {
  await connectMongo();  // Connect to MongoDB

  if (req.method === 'POST') {
    try {
      const task = await Task.create(req.body);
      res.status(201).json(task);
    } catch (error) {
      res.status(400).json({ error: 'Failed to create task' });
    }
  }

  else {
    res.status(405).json({ message: 'Method not allowed' });
  }
}
Read Tasks (GET)
  if (req.method === 'GET') {
    try {
      const tasks = await Task.find({});
      res.status(200).json(tasks);
    } catch (error) {
      res.status(500).json({ error: 'Failed to fetch tasks' });
    }
  }
Update Task (PUT)
In pages/api/tasks/[id].js:
  if (req.method === 'PUT') {
    const { id } = req.query;
    try {
      const task = await Task.findByIdAndUpdate(id, req.body, { new: true });
      res.status(200).json(task);
    } catch (error) {
      res.status(400).json({ error: 'Failed to update task' });
    }
  }
Delete Task (DELETE)
if (req.method === 'DELETE') {
    const { id } = req.query;
    try {
      await Task.findByIdAndDelete(id);
      res.status(204).end();  // No Content
    } catch (error) {
      res.status(400).json({ error: 'Failed to delete task' });
    }
  }
Creating the Frontend
5. Build CRUD Pages
Create Task Form (pages/index.js):
import { useEffect, useState } from 'react';

export default function Home() {
  const [tasks, setTasks] = useState([]);
  const [title, setTitle] = useState("");
  const [description, setDescription] = useState("");
  const [taskId, setTaskId] = useState(null);
  const [isEditing, setIsEditing] = useState(false);

  useEffect(()=>{
    fetchTasks();
  },[])

  // Fetch tasks from API
  async function fetchTasks() {
    const res = await fetch('/api/tasks');
    if (!res.ok) {
      console.error('Failed to fetch tasks');
      return;
    }
    const data = await res.json();
    setTasks(data);
  }

  // Handle form submission
  const handleSubmit = async (e) => {
    e.preventDefault();
    const task = { title, description };

    if(isEditing){
      handleUpdate(taskId,task);
    }else{
      const res = await fetch('/api/tasks', {
        method: 'POST',
        headers: { 'Content-Type': 'application/json' },
        body: JSON.stringify(task),
      });

      if (res.ok) {
        setTitle('');
        setDescription('');
        fetchTasks();  // Refresh task list
      } else {
        console.error('Failed to create task');
      }
    }
  };

  const handleDelete = async (id) => {
    try {
      // Optimistically remove the task from the UI
      setTasks(tasks.filter((task) => task._id !== id));

      const res = await fetch(`/api/tasks/${id}`, {
        method: 'DELETE',
      });

      if (!res.ok) {
        throw new Error('Failed to delete task');
      }

      console.log('Task deleted successfully');
      fetchTasks(); // Reload tasks to sync with the backend
    } catch (error) {
      console.error(error.message);
      // Revert the optimistic UI update on failure
      fetchTasks();
    }
  };


  const handleEdit = (task) => {
    setTitle(task.title);
    setDescription(task.description);
    setTaskId(task._id);
    setIsEditing(true);
  };


  const handleUpdate = async (id, updatedTask) => {
    try {
      const res = await fetch(`/api/tasks/${id}`, {
        method: 'PUT',
        headers: { 'Content-Type': 'application/json' },
        body: JSON.stringify(updatedTask),
      });

      if (!res.ok) {
        throw new Error('Failed to update task');
      }

      const data = await res.json();
      console.log('Updated Task:', data.task);
      setTitle('');
      setDescription('');
      setTaskId(null);
      setIsEditing(false);
      fetchTasks(); // Reload tasks after successful update
    } catch (error) {
      setTitle('');
      setDescription('');
      setTaskId(null);
      setIsEditing(false);
      console.error(error.message);
    }
  };


  return (<>
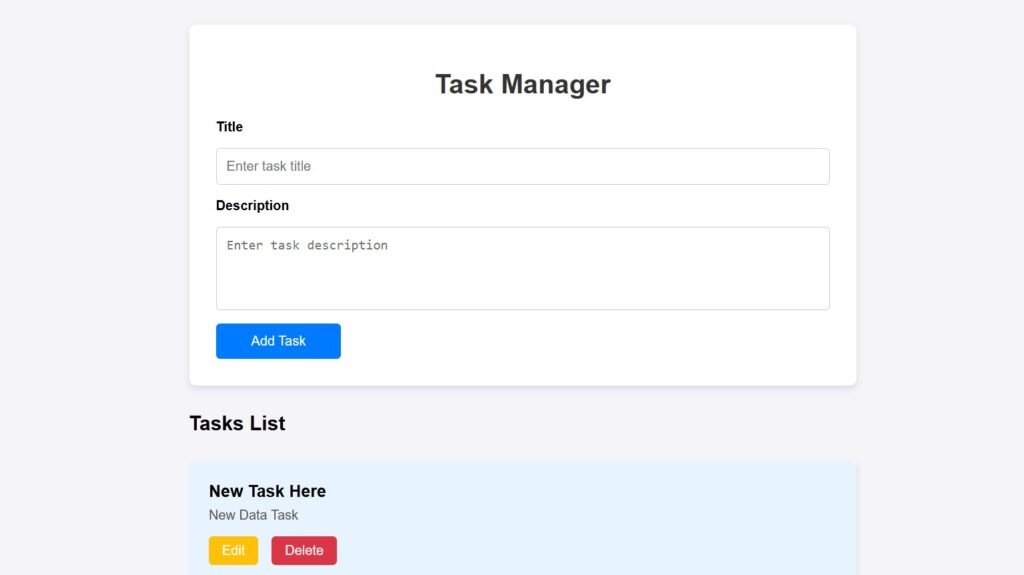
    <div className="container">
        <h1 className="title">Task Manager</h1>
        <form className="task-form" onSubmit={handleSubmit}>
          <label>Title</label>
          <input
            type="text"
            placeholder="Enter task title"
            value={title}
            onChange={(e) => setTitle(e.target.value)}
            required
          />

          <label>Description</label>
          <textarea
            placeholder="Enter task description"
            value={description}
            onChange={(e) => setDescription(e.target.value)}
            required
          />

          <button type="submit" className="submit-btn">
            {isEditing ? "Update Task" : "Add Task"}
          </button>
        </form>

      </div>

    <div className='con-wrapper'>
    <h2>Tasks List</h2>
    <ul className="task-list">
      {tasks?.length>0?tasks.map((task) => (
        <li key={task._id} className="task-item">
          <h3>{task.title}</h3>
          <p>{task.description}</p>

          <div className="task-actions">
            <button
              className="edit-btn"
              onClick={() => handleEdit(task)}
            >
              Edit
            </button>
            <button
              className="delete-btn"
              onClick={() => handleDelete(task._id)}
            >
              Delete
            </button>
          </div>
        </li>
      )):<li className="task-item-not-found">Task not found !</li>}
    </ul>
    </div>
    </>
  );
}
6. Adding Global style
To style the Task Manager component, add some styles to the global CSS file.
Create a new file styles/styles.css
/* Global Styles */
* {
  box-sizing: border-box;
}

body {
  font-family: Arial, sans-serif;
  background-color: #f4f4f9;
  margin: 0;
  padding: 0;
}

.container {
  max-width: 800px;
  margin: 2rem auto;
  padding: 2rem;
  background: #fff;
  border-radius: 8px;
  box-shadow: 0 4px 8px rgba(0, 0, 0, 0.1);
}

.title {
  font-size: 2rem;
  margin-bottom: 1.5rem;
  color: #333;
  text-align: center;
}

.task-form {
  display: flex;
  flex-direction: column;
  gap: 1rem;
}

.task-form label {
  font-size: 1rem;
  font-weight: bold;
}

.task-form input,
.task-form textarea {
  padding: 0.75rem;
  font-size: 1rem;
  border: 1px solid #ccc;
  border-radius: 5px;
  width: 100%;
}

.task-form textarea {
  height: 100px;
  resize: none;
}

.submit-btn, .load-btn {
  padding: .75rem 1.5rem;
  font-size: 1rem;
  color: #fff;
  background: #007bff;
  border: none;
  border-radius: 5px;
  cursor: pointer;
  transition: background .3s;
  max-width: 150px;
}

.submit-btn:hover,
.load-btn:hover {
  background: #0056b3;
}


.con-wrapper{
  display: block;
  margin-left: auto;
  margin-right: auto;
  max-width: 801px;
}

.task-list {
  list-style: none;
  padding: 0;
  margin-top: 2rem;
  box-shadow: 2px 3px 6px #0001;
}


.task-item {
  background: #e7f3ff;
  padding: 1.5rem;
  margin-bottom: 1rem;
  border-radius: 8px;
  font-size: 1rem;
  position: relative;
  text-transform: capitalize;
}

.task-item-not-found {
  background: #f0f0f0;
  padding: 1.5rem;
  margin-bottom: 1rem;
  border-radius: 8px;
  color: #8a8a8a;
  font-size: 1rem;
  position: relative;
  text-transform: capitalize;
}

.task-item h3 {
  margin: 0;
  font-size: 1.25rem;
}

.task-item p {
  margin: 0.5rem 0;
  color: #555;
}

.task-actions {
  display: flex;
  gap: 1rem;
  margin-top: 1rem;
}

.edit-btn,
.delete-btn {
  padding: 0.5rem 1rem;
  font-size: 1rem;
  border: none;
  border-radius: 5px;
  cursor: pointer;
  transition: background 0.3s ease;
}

.edit-btn {
  background: #ffc107;
  color: #fff;
}

.edit-btn:hover {
  background: #e0a800;
}

.delete-btn {
  background: #dc3545;
  color: #fff;
}

.delete-btn:hover {
  background: #c82333;
}
Source code
Click here to download the source code from GitHub. Exploring the project will help you understand its functionality and enhance your coding skills through hands-on practice.
FAQs:
Q1: What makes Next.js 15 ideal for CRUD applications?
A: Its API routes, server-side rendering, and flexibility for building full-stack apps make it ideal.
Q2: Can I use other databases with Next.js?
A: Yes, Next.js supports various databases like PostgreSQL, Firebase, and Prisma.
Q3: Is MongoDB free to use?
A: MongoDB offers a free tier on its Atlas cloud service.
Conclusion: Build with Confidence
Congratulations! You’ve mastered CRUD operations with Next.js 15 and MongoDB. Use this guide as a roadmap to build modern web applications efficiently. For more in-depth tutorials, subscribe to our newsletter and stay ahead in the web development game.
Have questions or suggestions? Drop a comment below or share this article with fellow developers. For more tips, explore related guides on jsupskills.dev. Happy coding!

 Install jsUpskills app on your home screen!